Widgets are crucial elements of any Magento | Adobe Commerce store as they help customers to surf an online store with ease. Simply put, a widget is an element that stands for adding static or dynamic content to a website’s pages. You can add these components to any CMS block of your store. Today, we’ll look at default Magento 2 widgets and find out how to create custom widgets in Magento | Adobe Commerce.
Default Magento | Adobe Commerce Widgets
Before starting to create a widget, we need to deal with standard widgets in Magento | Adobe Commerce:
Recently Compared/Viewed Products. Usually, you use this widget to display viewed and compared products in the sidebar of a catalog page. You can configure the number of listed products in every single block, their attributes, and call-to-action buttons.
Order and Returns. A must-have widget for any online store that provides access to orders and returns. With its help, customers can review ordered or returned products by providing their Order ID, Billing Last Name, and either the Email Address or ZIP Code.
Catalog Product List. You can call this widget “Featured Products”. Every online store has it on the home page for product promotion. Usually, it contains a product with brief details like price, image, and a CTA button like Add to Cart or Add to Wishlist.
Catalog Product Link. This widget allows store admins to manage related products, cross-sells and upsells, grouped products.
Catalog Product List. Displays a list of products from the catalog.
Catalog New Products List. Displays a block of products that have been designated as new, for the duration of time specified in the product record.
Catalog Category Link. Displays either an inline or block-style link to a selected catalog category. When the link is complete, it can be used in content pages and blocks.
CMS Page Link. Displays a link to a specific CMS page.
CMS Static Block. Displays a block of content at a specific location on a page.
With the help of widgets you can add:
- Dynamic/informational blocks in sidebars
- Banners in CMS pages
- Custom menus
- Interactive user interfaces
How to Add “Featured Products” Widget to the Home Page
Let’s take a look at adding one of the most wide-used widgets to your Magento | Adobe Commerce store.
- Go to Content > Widgets
- Press the Add Widget button > Settings > Type > Catalog New Product List
- Select the Design Theme option (Magento Luma) and click Continue
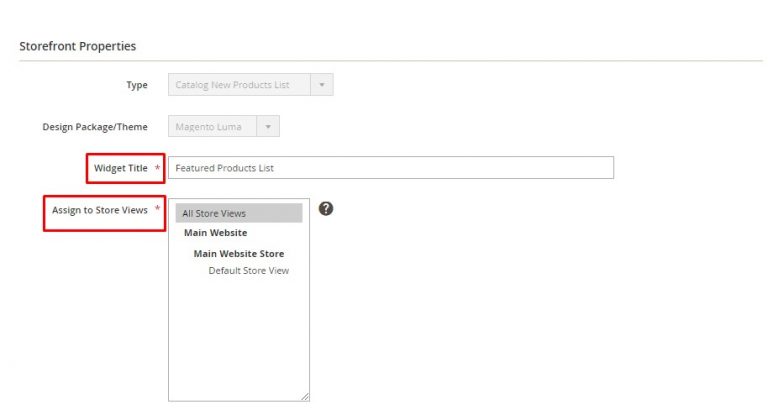
- Set the Widget Title and Storefront Properties
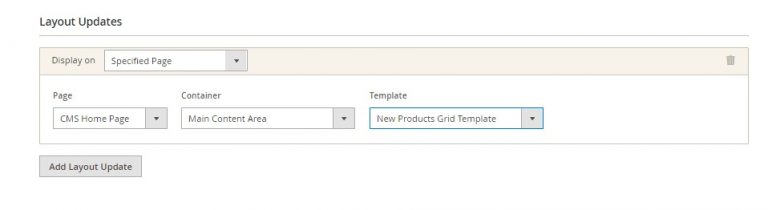
 5. Set Layout Updates (the place to display our widget)
Here are the settings:
- Display on: Specified Page
- Page: CMS Home Page
- Container: Main Content Area
- Template: New Products List Template
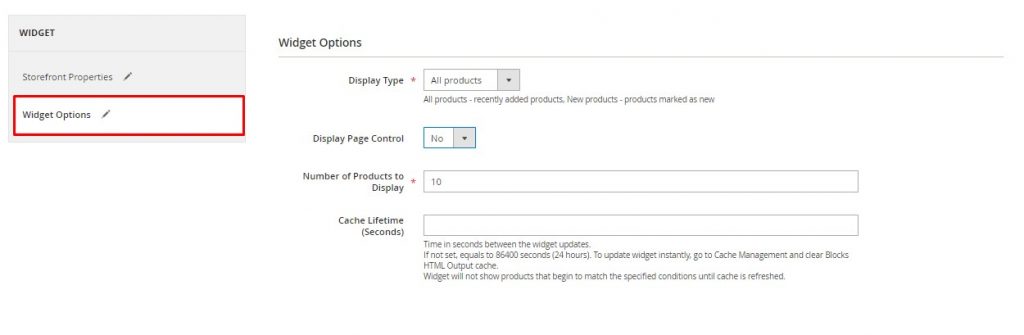
- Move to the Widget Options tab to set product types to display, including limits to the number of products, and so on.
- Display Type: Select All Products to display the most recently added products. Select New Products to display products marked as “New”.
- Display Page Control: If you want to let your customers control navigation for multiple lists, select Yes and enter the number of products into the list (if it’s necessary).
- Number of Products to Display: define how many products to display in the New Products section.
- Cache Lifetime: Set it if it’s necessary.
 How to Create a Custom Widget
Step 1. Declare a Widget
etc/widget.xml
1 2 3 4 5 6 7 8 9 10 11 12 13 |
<widgets xmlns:xsi="http://www.w3.org/2001/XMLSchema-instance" xsi:noNamespaceSchemaLocation="urn:magento:module:Magento_Widget:etc/widget.xsd"> <widget class="OrangeCompany\Learning\Block\Widget\Test" id="orange_test_widget"> <label>My New Widget</label> <description>This is a test widget!!!</description> <parameters> ... </parameters> <containers> ... </containers> </widget> </widgets> |
Add a dependency to Magento_Widget in the module.xml file.
1 2 3 4 5 |
... <sequence> <module name="Magento_Widget" /> </sequence> ... |
Step 2. Add Widget Parameters
As a parameter, we can use any of these field types:
- text
- select
- multiselect
- block
1 2 3 4 5 6 7 8 9 10 11 12 13 14 15 16 17 18 19 20 21 22 23 24 25 |
<widgets xmlns:xsi="http://www.w3.org/2001/XMLSchema-instance" xsi:noNamespaceSchemaLocation="urn:magento:module:Magento_Widget:etc/widget.xsd"> <widget class="OrangeCompany\Learning\Block\Widget\Test" id="orange_test_widget"> ... <parameters> <parameter name="title" xsi:type="text" required="true" visible="true" sort_order="10"> <label>Label</label> </parameter> <parameter name="size" xsi:type="select" visible="true" required="true" sort_order="20"> <label translate="true">Size</label> <options> <option name="s" value="S"> <label>S</label> </option> <option name="m" value="M" selected="true"> <label>M</label> </option> <option name="l" value="L"> <label>L</label> </option> </options> </parameter> </parameters> </widget> </widgets> |
Step 3. Check the widget
Run the following commands to apply the module dependency declared in module.xml.
| bin/magento module:disable Vendor_Module |
| bin/magento module:enable Vendor_Module |
where Vendor_Module is replaced with the module name.
After clearing the cache, the new widget My New Widget should be available.
Step 4. Create the Block
Create the block class that we provided on the widget’s initialization, responsible for rendering it on the frontend.
OrangeCompany/Learning/Block/Widget/Test
1 2 3 4 5 6 7 8 9 |
namespace OrangeCompany\Learning\Block\Widget; use Magento\Framework\View\Element\Template; use Magento\Widget\Block\BlockInterface; class Test extends Template implements BlockInterface { protected $_template = "widget/test.phtml"; } |
Step 5. Create the template
Finally, create the template that will be used for showing the widget’s data on the frontend.
OrangeCompany/Learning/view/frontend/templates/widget/test.phtml
1 2 3 4 5 |
<?php /** \OrangeCompany\Learning\Block\Widget\Test $block */ ?> <h3><?= $block->escapeHtml($block->getData('title')) ?></h3> <h3><?= $block->escapeHtml(__('Size:')) ?> <?= $block->escapeHtml($block->getData('size')) ?></h3> |
Step 6. Clean Cache
Clean the Magento cache with the following command:
| bin/magento cache:clean |
Don’t Want to Create Widgets by Yourself?